

All Topics
- Alchemizing Music Concepts for Students
- Anuv Jain Songs
- Artist Spotlight
- artium gift card
- Artium Maestros
- Artium News
- Artium Practice Studio
- Artium Tech Blog
- Best Coke Studio Songs
- Best Female Singers
- Birthday songs
- Bollywood Love Songs
- buying guide
- Carnatic Music
- Child Singers
- Devotional Music
- Editorials by Ananth Vaidyanathan
- English Love Songs
- Festival
- Film Music
- Ghazal Music
- Guitar
- Hindustani Classical Music
- Indian Classical Music
- Indian Folk Music
- Insights
- Instagram Reels Viral Songs
- Instruments
- Karaoke
- Karaoke Singing
- Keyboard
- Kids Music
- maestros
- Music Education
- Music for Kids
- Music Games
- Music Industry
- Music Instruments
- Music Legends
- Music Press Release
- Music Technology
- Music Theory
- Music Therapy
- Music Tools
- Piano
- piano guide
- Songs
- South Devotional Music
- Success Stories
- Tamil Film Music
- Telugu Film Music
- Time Theory
- Tools
- Uncategorized
- Uncategorized
- Uncategorized
- Uncategorized EN US
- Vocal Range
- Vocal Singing
- Vocals
- western classical music
- western music
- Western vocal music
How to Hold a Guitar Correctly for Beginners
How to Hold a Guitar Correctly for Beginners

Table of Contents
Quick Summary
| Playing the guitar in a relaxed position and holding it firmly. Hold the guitar with a straight back, both feet flat on the floor, the guitar resting on the right leg, the neck at a slight angle up, and your thumb is behind the neck of the guitar. Keep the end of your fretting-hand finger just behind the fret it is pressing, keep the rest of the finger on the fingerboard, keep your hand loose at the neck of the guitar, and keep the hand of your picking or strumming hand loose near the guitar’s bridge or sound hole. |
Introduction
Learning how to hold a guitar is the first practical step before chords, strumming, or songs. Holding a guitar properly is the first thing to get right, ahead of chords, strumming, and songs. The right hold prevents your hand from twisting and ensures your fingers can stretch over the fretboard.
This is the same for you all, although the bass and electric players may find it easier to find a position for sitting and playing. The goal is to be able to comfortably support your instrument and hold it properly, without any excessive pressure. If learning to play guitar, initially learn to sit with your guitar comfortably before you move to a strap. A good setup also makes it easier to follow lessons and understand guitar music theory.
Why Learning How to Hold a Guitar Matters
If beginners wonder, “How do you hold a guitar?”, they usually want to know the best position to hold the guitar. But in fact, the right way to hold the guitar is that your back, shoulders, wrists and hand are relaxed and you can sound out the notes.
A stable guitar position helps you:
- Place your fingertips close behind the frets.
- Strum smoothly without hitting the wrong strings.
- Move between chords with less tension.
- Avoid unnecessary wrist, shoulder, and neck strain.
- Build good habits before learning faster songs.
If your guitar slides out, pitches forward, or wiggles, this causes you to hold your hands stiffly to compensate. This may lead to muted strings, dull notes, and sore playing hands. Before you try, see how to tune a guitar so each note and chord rings out properly.
Watch: How to Hold a Guitar Correctly
Seeing the technique in action can make it much easier to understand. In this short video, one of Artium Academy’s expert guitar teachers demonstrates the correct way to sit with your guitar, position your hands, and maintain a comfortable posture while playing.
Watch the full lesson here:
Basic Guitar Posture Principles (Before You Start Playing)
Prior to learning how to properly hold a guitar, adapt your seat and your posture.
- Sit on a hard chair without arm rests with your feet flat on the floor.
- Don’t keep your back as straight as possible, keep it as relaxed as you can, don’t lean so far forward, and don’t slouch.
- Relax your shoulders and keep them level.
- Allow the guitar to rest near your body, with the side of the back of the instrument gently pressed against your torso.
- Generally try to keep the wrists fairly straight, not sharply bent.
- Breathe slowly before striking a note and observe if you have any tension in your hands and shoulders.
A good rule of thumb: if it is painful, numb or tingly, STOP and CHANGE. Correct technique should feel in control, not painful.
Acoustic Guitar Position: Sitting Correctly
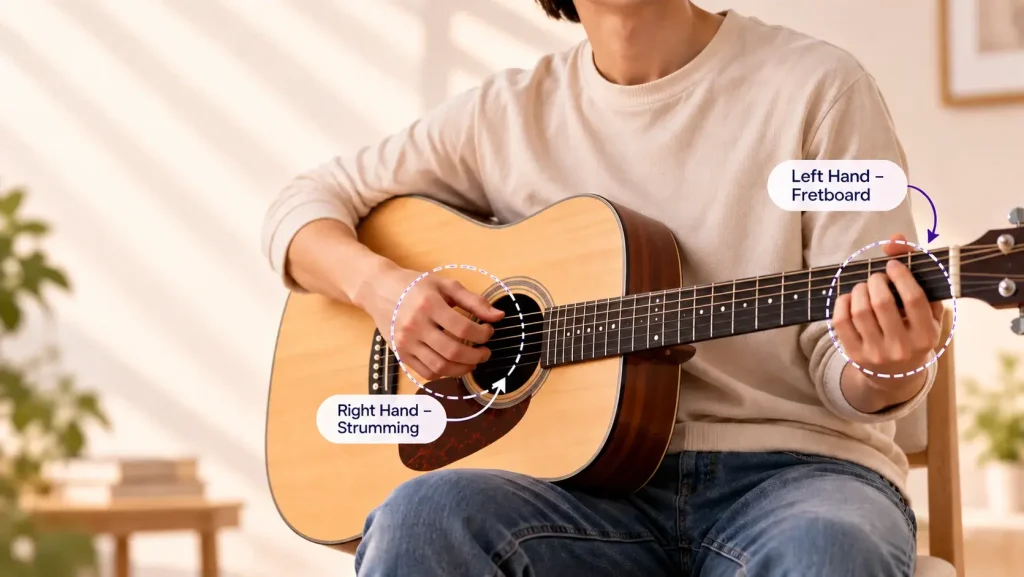
The guitar is positioned on the left leg (for right handed playing), with the neck pointing slightly up and the body near the torso. The hand used for fretting notes is the left hand, while the right hand is used for strumming or picking near the sound hole.
Let the body of the guitar rest against your ribs and stomach instead of letting it lean out. Keep your right arm over the upper part of the guitar body without gripping or applying force.
1. Classical/Footstool Position
In the classical position, players frequently lift their left leg off the ground with a footstool. This elevates the guitar and makes it more comfortable to maintain a generally upward pointing neck.
● Place your left foot on a footstool.
● Rest the guitar on the left leg.
● Hold the lower bout of the guitar against your right inner thigh to help steady the instrument.
● Angle the neck upward, around 30-45 degrees.
● Keep both shoulders relaxed.
This position is particularly good for classical guitar, fingerstyle playing, and those that want a very steady position for their guitar.
2. Casual Sitting Position
If you’re playing guitar acoustically, you can keep both your feet on the ground and put your guitar on your left leg. It’s okay to cross your legs if you find this more comfortable, but don’t lift your guitar so high that your shoulders elevate.
This casual setting is fine for pop, rock, and everyday practice. Just remember to keep the guitar in place without clenching it with your legs or strumming arm.
Electric Guitar Sitting Position: What’s Different
Electric guitars tend to be slim and light enough to fit comfortably on your right leg, so this is typical for most right-handed players. You’ll often see this style of sit as you play rock and blues because it allows your picking hand to be at a natural angle near the bridge.
But there are no banned positions. For those practicing chords and seeking the acoustic way of playing, place the electric on your left leg. Use that position which is comfortable with your wrist straight, shoulders relaxed.
For an electric guitar, don’t keep the guitar too low while standing. Having a low guitar might look cool, but it’s tricky to fret and pick precisely.
Guitar Hand Position: Fretting Hand and Strumming/Picking Hand
You should be able to use both hands without forcing. The fretting hand is responsible for pushing the strings down while the strumming or picking hand provides rhythm and sound.
1. Correct Fretting Hand Thumb and Finger Placement
Put your left thumb behind the neck of the guitar, in line with your first or second finger. Do not wrap your thumb over the top of the neck; keep it relaxed behind the neck of the guitar.
Position your fingertips just behind of the fret wire, never directly on top of the fret wire. For instance, if you are fretting at the third fret, rest your finger just behind the third fret wire.
Keep fingers curved with tips pressing the strings. Do not flatten fingers across next door strings as you can mute the notes out. If you are asking how to put fingers on guitar the answer is, “curved fingertips, close behind the fret, relaxed thumb”.
2. Strumming or Picking Hand Position Near the Sound Hole/Bridge
For an acoustic guitar, place the back of your right forearm on the body of the guitar with your hand just above the sound hole. Allow your wrist to be loose so the movement primarily originates from your wrist and forearm.
Position your picking hand for the electric guitar either close to the bridge, depending on the sound you want. Nearer the bridge produces a sharper sound, while moving up closer to the neck produces a warmer sound.
When choosing a pick, you’ll want to know how to hold a guitar pick the right way. Rest the pick between the thumb and side of the index finger, exposing just a small amount of the pick. Keep the pick held gently, not tightly.
How to Hold a Guitar With a Strap (Standing Position)
When you’re able to sit comfortably, practice standing with a strap. A strap keeps the guitar held in position without putting undue strain on your hands.
Adjusting Strap Length for Comfort
Set the strap to where you would hold the guitar if you were standing, which should be the same height as while standing, not low by your knees, or so high it would inhibit your arm movement.
A quick test: play in a relaxed stance with loose shoulders, look where your fingers end up if you try to put them behind the frets, and ask if you have to stretch or twist your wrist abruptly. If so, make the strap longer.
Maintaining the Same Hand Position Standing vs Sitting
Your hand position should not change much whether you are standing or sitting. The guitar will possibly shift a little bit but keep your thumb off the back of the neck and keep your pick hand relaxed.
If your wrist flexes too much or if your shoulder lifts when you’re standing up, the strap is normally too far down. Lift the guitar up a little higher and try again.
How to Hold a Bass Guitar Correctly
In terms of playing position, the bass is held in the same way as an electric guitar, but the longer neck and thicker strings require more care when it comes to your posture. Sit up straight and rest the bass on your right leg if you’re right-handed.
Keep the thumb of your fretting hand behind the neck and don’t bend the wrist at a sharp angle to get to lower frets. Pluck close to the pickup with the hand relaxed, using the fingertips or pick as needed for the tone you want.
Since the bass strings are thicker, don’t press so hard! Apply enough pressure to get a nice clean sound and then loosen up your hand when changing notes.
Guitar Positions for Left-Handed Players
Left handed players can either Play with a left-handed guitar or restring a right-handed guitar for left-handed use. The principles of the playing position are identical, however you flip the instrument over.
For a left-handed player using a standard left-handed setup:
- Rest the guitar on the right leg.
- Use your right hand to finger the strings.
- Strum and Pick with the Left Hand.
- Keep the fretting-hand thumb behind the neck.
- Place fingertips just behind the fret wire.
If you are learning how to hold a guitar right handed, then the guitar is placed on your right thigh and your right hand strums the strings. Reverse all of this for left-handed guitar players.
Common Mistakes Beginners Make When Holding a Guitar
A lot of beginning problems are small posture behaviors. Here are some of the most common:
- Slouching: It limits the breath and puts tension on the back and shoulders.
- Guitar tilting too far forward: you can’t see the fretboard, and it’s more difficult to reach your chords.
- Thumb wrapping over the neck: It can limit finger movement and cause wrist strain.
- Bending the wrist too much: This, even more than Barre Chords, can be quite painful.
- Gripping the guitar with the strumming arm: It restricts natural strumming movement.
- Holding the guitar too low when standing: It makes accurate playing more difficult.
- Pressing too hard on the strings: Use only enough pressure to make a clean sound.
- Ignoring strap adjustment: A poorly adjusted strap changes your hand position and creates tension.
How Poor Guitar Posture Leads to Wrist and Shoulder Pain
If bad guitar posture is not really an injury, it will take some time to develop. Usually it will accumulate over time, after several practice sessions.
If the guitar is too low or leans forward, you’ll have to flex your wrist to comfortably reach the fretboard. Constant wrist flexion can lead to discomfort in the shoulder, arm, and wrist muscles and tendons. If your strap is too long, the fretting shoulder will be up or your arm will be extended.
Don’t ignore pain, tingling, numbness or a sharp burning sensation in your wrist, hand, elbow, neck or shoulder. Rest, stop practising, change your posture. If it persists after resting, see a fitness or medical expert for a medical examination.
Simple Exercises to Check and Correct Your Posture
Try these short checks before each practice session:
- Shoulder check: Breathe in deeply and relax your shoulders. They should stay relaxed as you play.
- Thumb check: Rest the thumb on the back of the neck and strike a few notes. Don’t press the thumb into the neck forcefully.
- Wrist check: Play an easy chord, then take a look at your wrist. Make sure that your wrist is generally straight rather than nasty bent back.
- Guitar stability check: Take your strumming hand away from the guitar and see if it stands comfortably.
- Mirror check: Look at yourself in the mirror while you’re sitting or standing. Are your shoulders even and does your back feel relaxed?
- Two-minute reset: Play a simple chord or individual notes for two minutes. Stop and observe if you feel any tension. Relax if needed.
Conclusion
How to Hold a Guitar Properly Learning the correct way to hold a guitar has nothing to do with forcing yourself into a static position. Instead, focus on resting the guitar comfortably, maintaining a relaxed posture, and ensuring your hands are free to move about.
Begin by sitting down with the guitar resting near your body. Keep your fretting-hand thumb behind the neck of the guitar and place your fingertips just behind the fret wire. Once this position is comfortable, use a strap and set the guitar comfortably high. Once these habits feel good, you are ready to learn chords, rhythm, and songs confidently.
If you want to develop a solid technique early on, learn Guitar Online with Artium Academy live 1:1 classes, expert teachers, and GRMP-accredited curriculum.
Let’s get you started. Book your free 1:1 trial class at Artium Academy and learn at your pace from our certified teachers.
Frequently Asked Questions
Sit with your shoulders relaxed and upright. For a right-handed player, place the guitar on your left leg, keep the instrument body close to your ribs, angle the neck of the guitar slightly upward, and support your neck with your left thumb.
Use a left-handed guitar or convert a right-handed guitar for left-handed playing. Lay the guitar across your right leg, fret with your right hand, strum and pick with your left hand.
For an acoustic, rest your right forearm gently on the body, with your hand held over the sound hole. Keep the wrist relaxed, and use a comfortable pick grip if you’re using one.
Curve your fingers and rest the tips of your fingertips just behind the fret wire. Do not flatten your fingers down onto the other strings, as they may take the notes away.
“The 3 fret rule” is generally referring to keeping your finger in a position where you can press down on the notes within a distance of around 3 frets. This is useful in helping beginners keep a relaxed hand shape and reach the notes without having to stretch too much.
For a right-handed player, the guitar usually rests on the left leg. For a left-handed player, it usually rests on the right leg. Electric players may choose the opposite leg for comfort and picking angle.
Maintain the guitar at roughly the same elevation it was when you were sitting. Your wrists should be flat, your shoulders relaxed, and your fretboard accessible.
Position yourself upright, place the bass on your right leg if you are right-handed and a strap if need be. Keep the thumb behind the neck, do not overly bend the wrists, pluck close to the pickup with a limp hand.
Maybe. Typical issues are a low guitar, leaning back position, sharply bent wrist, too much pressure, or a very tight grip. Stop if it hurts, rest, and change your position; see a doctor if it still hurts.
Relax your fretting hand thumb behind the neck with your fingers lightly curled and the tips pressing just behind the fret. Keep your wrist fairly straight. Rest your strumming or picking arm lightly on the guitar with your hand naturally hanging down over the sound hole on an acoustic, or across the bridge on an electric. Don’t squeeze the neck of the guitar or grip the pick tightly.